How to Pull a Shot of Espresso
If you just got your first machine, and are wondering how to make espresso, this is the guide for you.
Making Espresso
The Basics
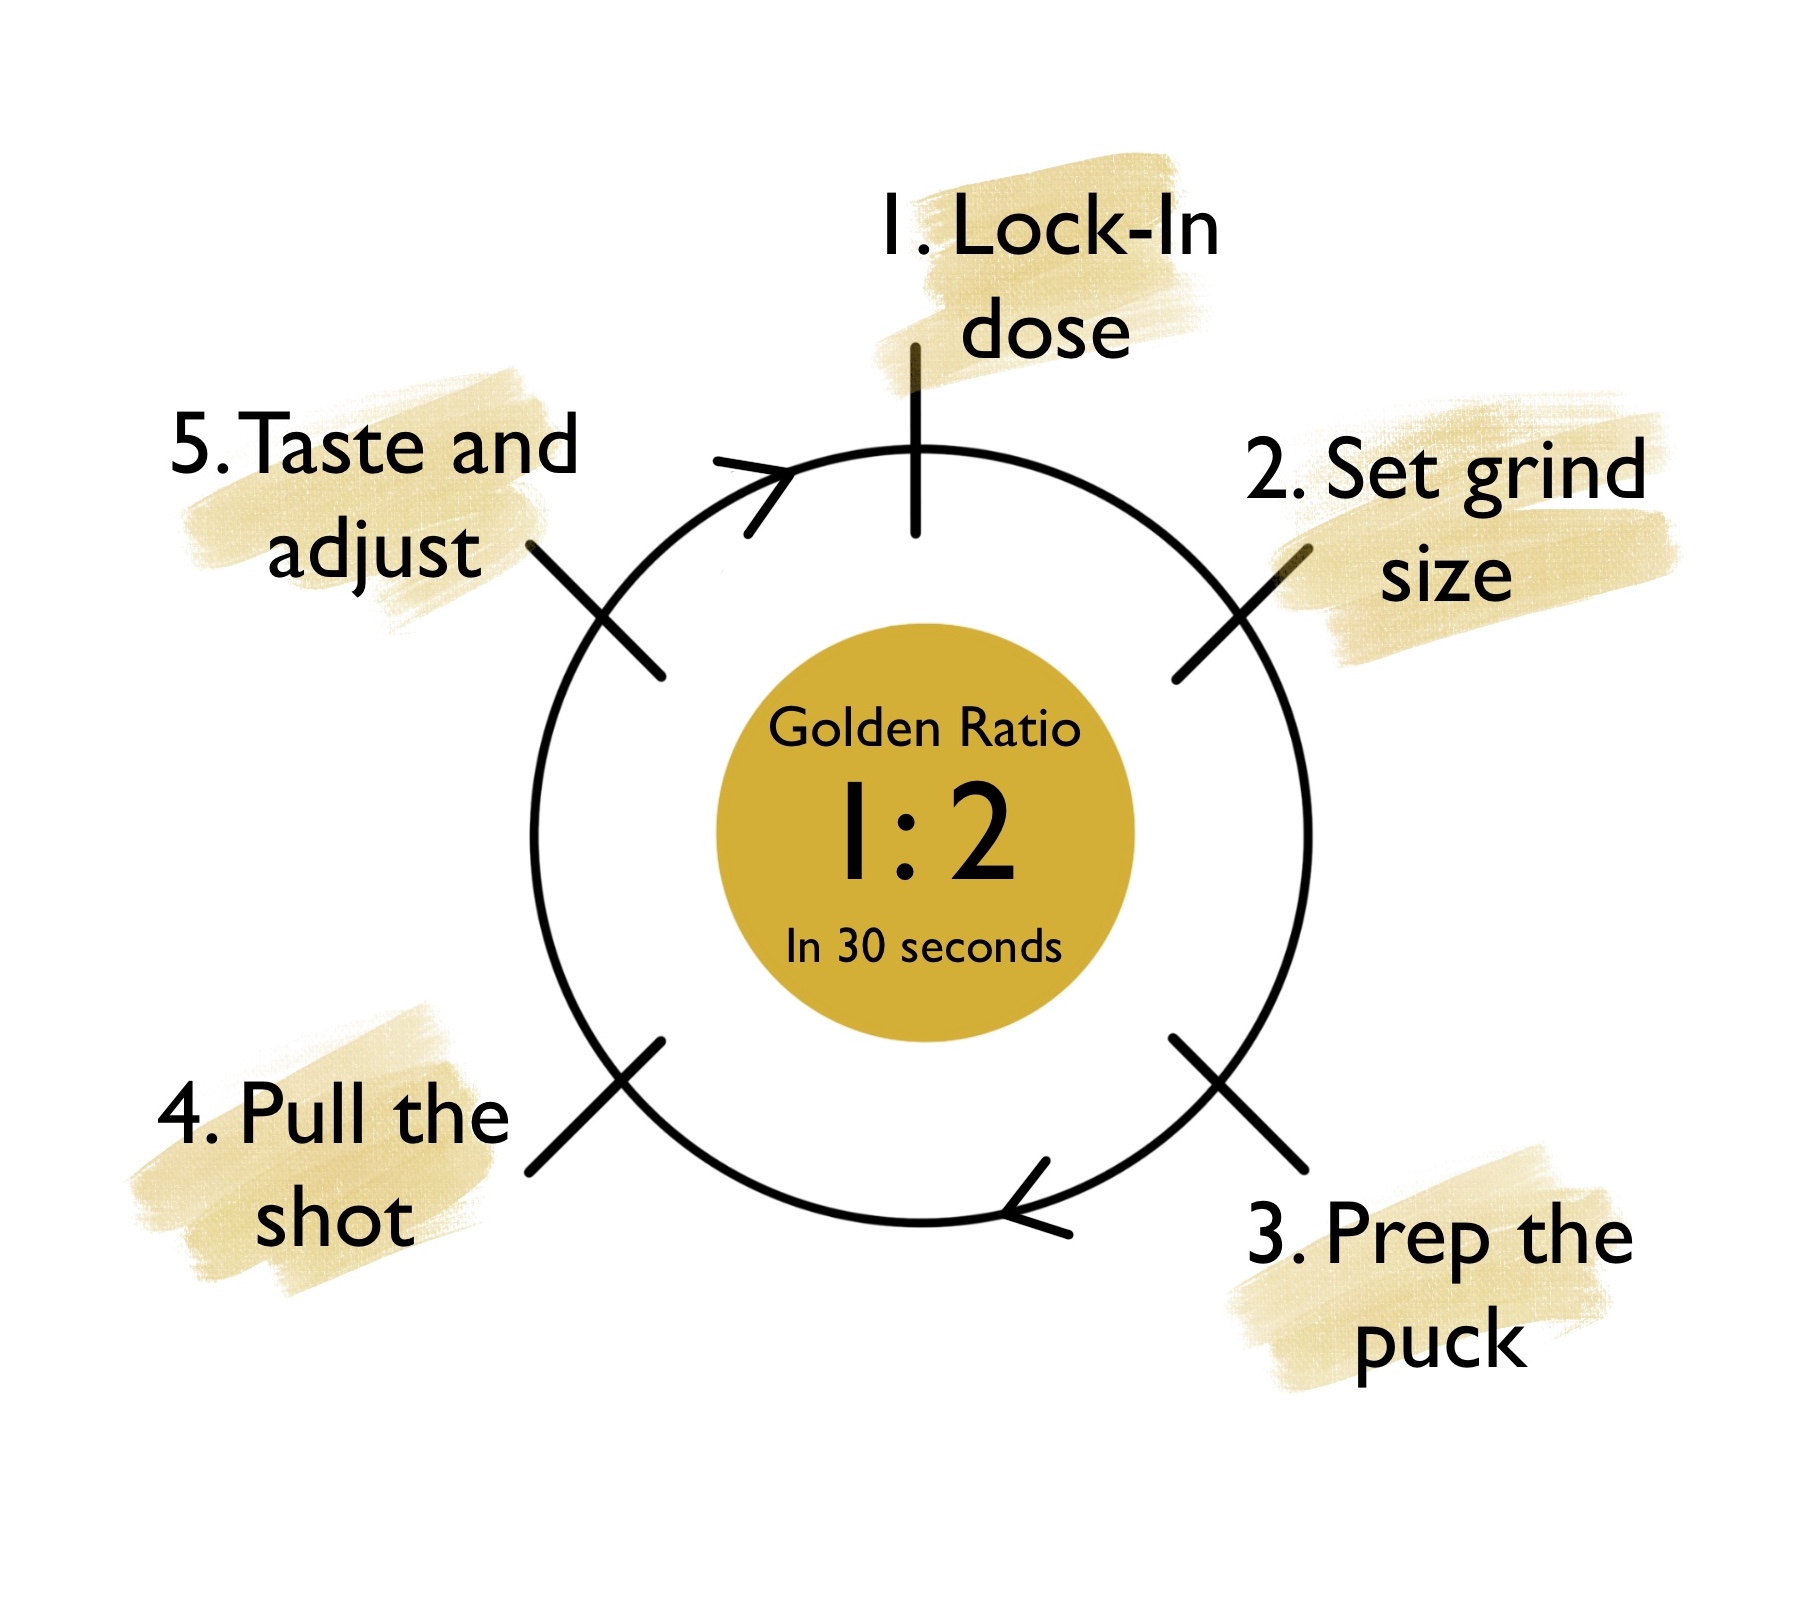
Espresso is a little bit like a mad science. There are lots of inputs and variables that all have to fit together in order to make a good shot. Luckily, this process can be simplied into 5 key steps, what we like to call the 'Fried Egg' method. This guide will walk you through how to pull a shot of espresso using the Fried Egg method and hopefully get you close to achieving the golden ratio.
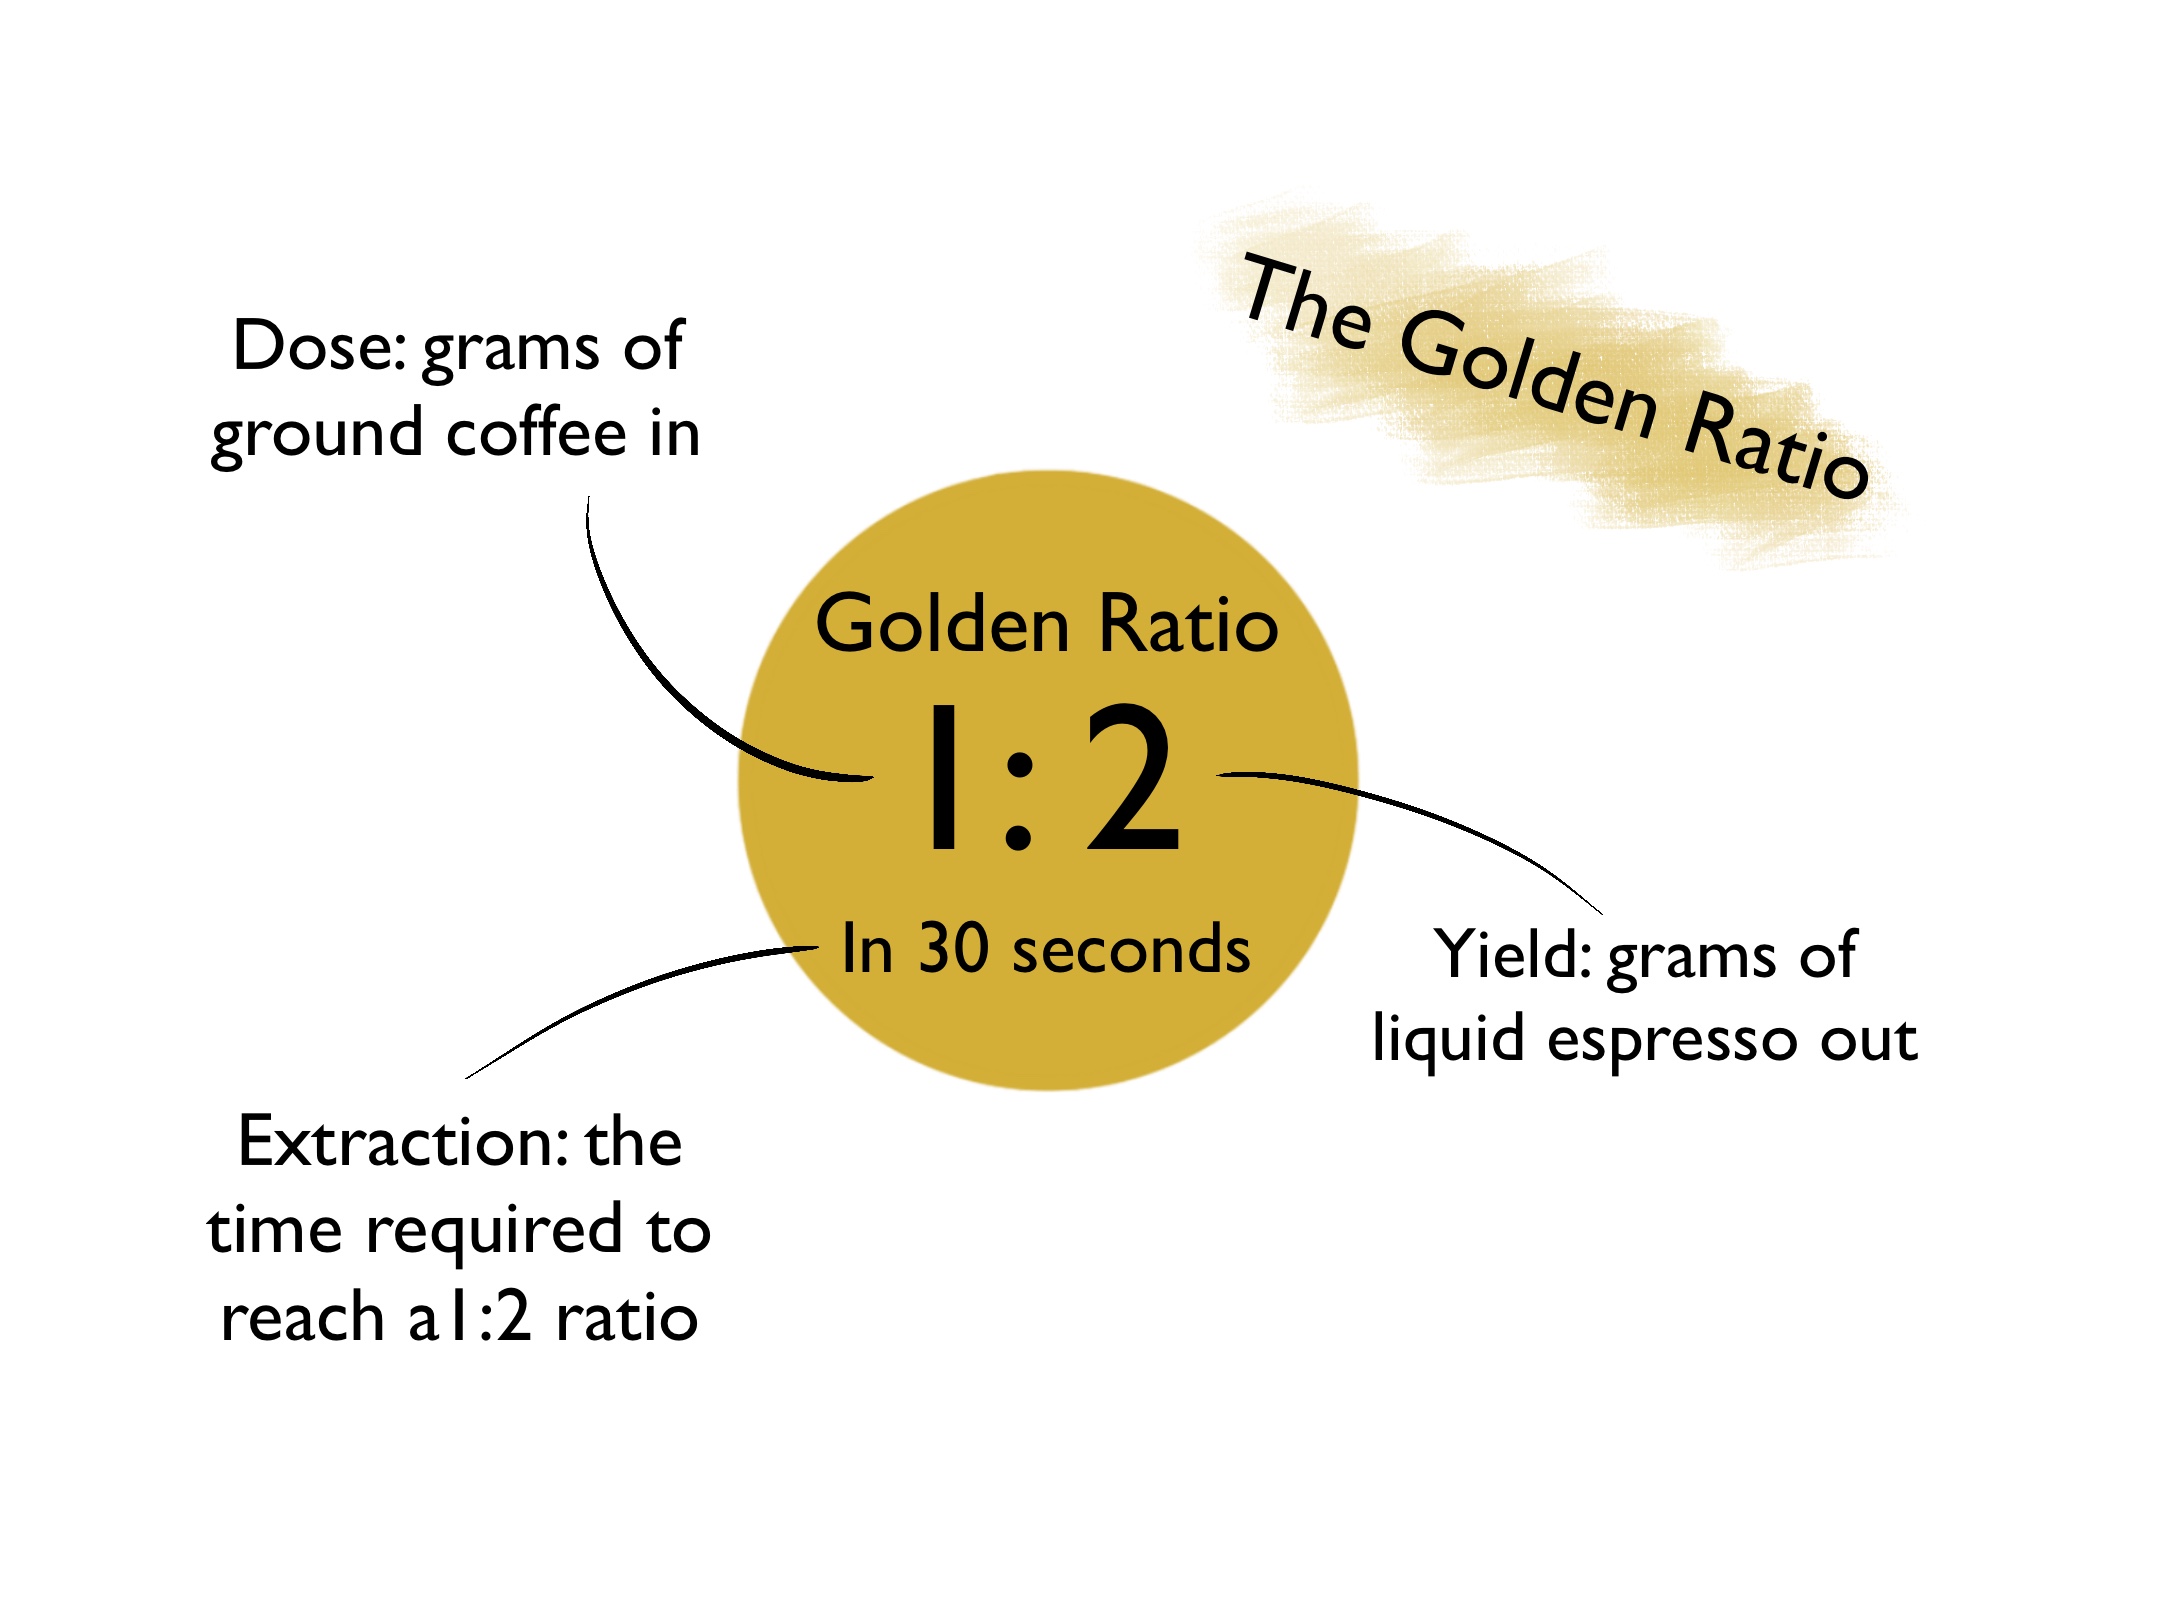
What's the Golden Ratio? Making espresso can be distilled down into a single guiding principle: the ratio between dose of coffee in, and the yield of liquid espresso out. This 'golden rule' is a the actualy just a guideline, but it's a good place to start, and will be our anchor as we pull our first shot. (More on this below)
An Iterative Experience: You likely won't pull the perfect shot on your first attempt, and that's okay. Espresso is an iterative process, and with each shot you pull, you'll be able to learn and adjust to get closer to the golden ratio and delicious espresso.
Pulling Your First Shot
Goal: The Golden Ratio
Extraction: Espresso is the process in which the soluble oils, acids, flavors, and aromas are extracted from ground coffee into water to create a strong and concentrated cup of coffee. If the hot water extracts the right amount of these compounds, a shot of espresso will present a sweet and complex flavor and texture.
Underextracted: If not enough of these compounds are extracted by the hot water, the espresso will be sour and salty. This is an underextracted espresso. Underextracted espresso often results from low temperatures, low pressures, and water needing more time in the bed of coffee before flowing out the bottom of the portafilter.
Overextracted: Alternatively, if too many compounds are extracted, the espresso will present as bitter or dry. This is an overextracted espresso. Overextracted espresso results from overly high temperatures, high pressures, and water spending too much time in the bed of coffee.
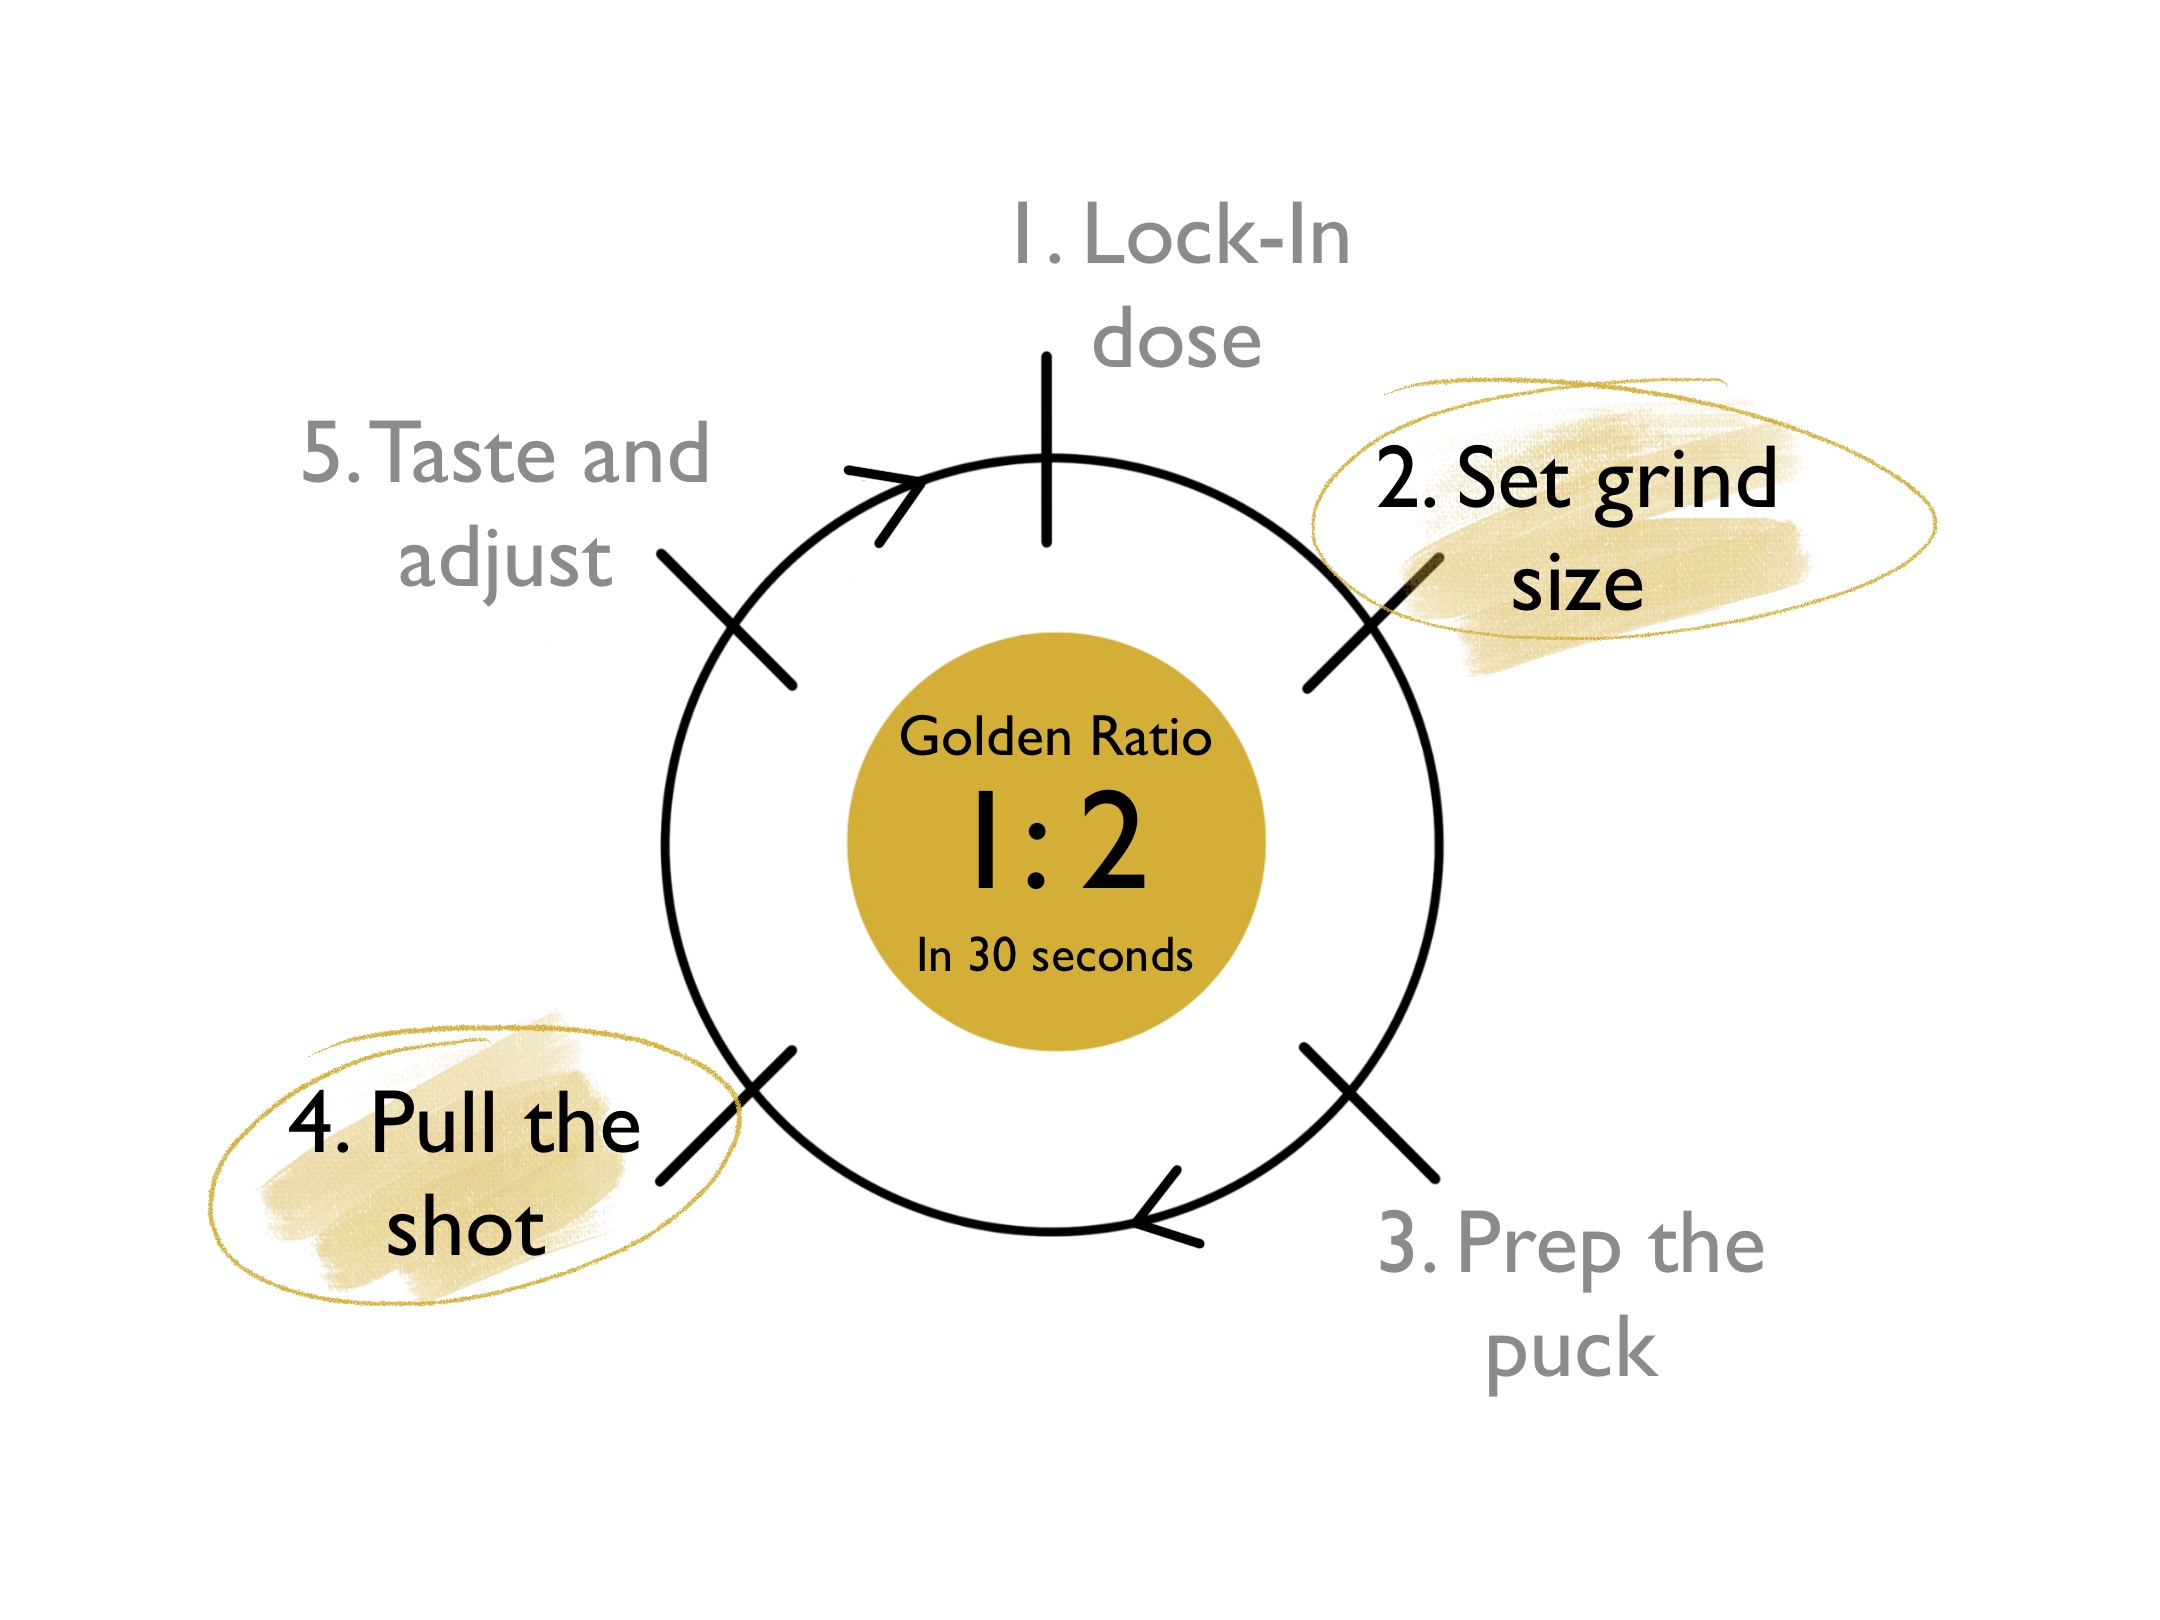
Golden Ratio: The golden ratio helps indicate if your espresso is correctly extracted and can be used as a starting point as you hone your taste. If you can adjust your variables to achieve a 1:2 ratio in 30 seconds, your espresso is likely to taste at least somewhat balanced without being severely bitter or sour.
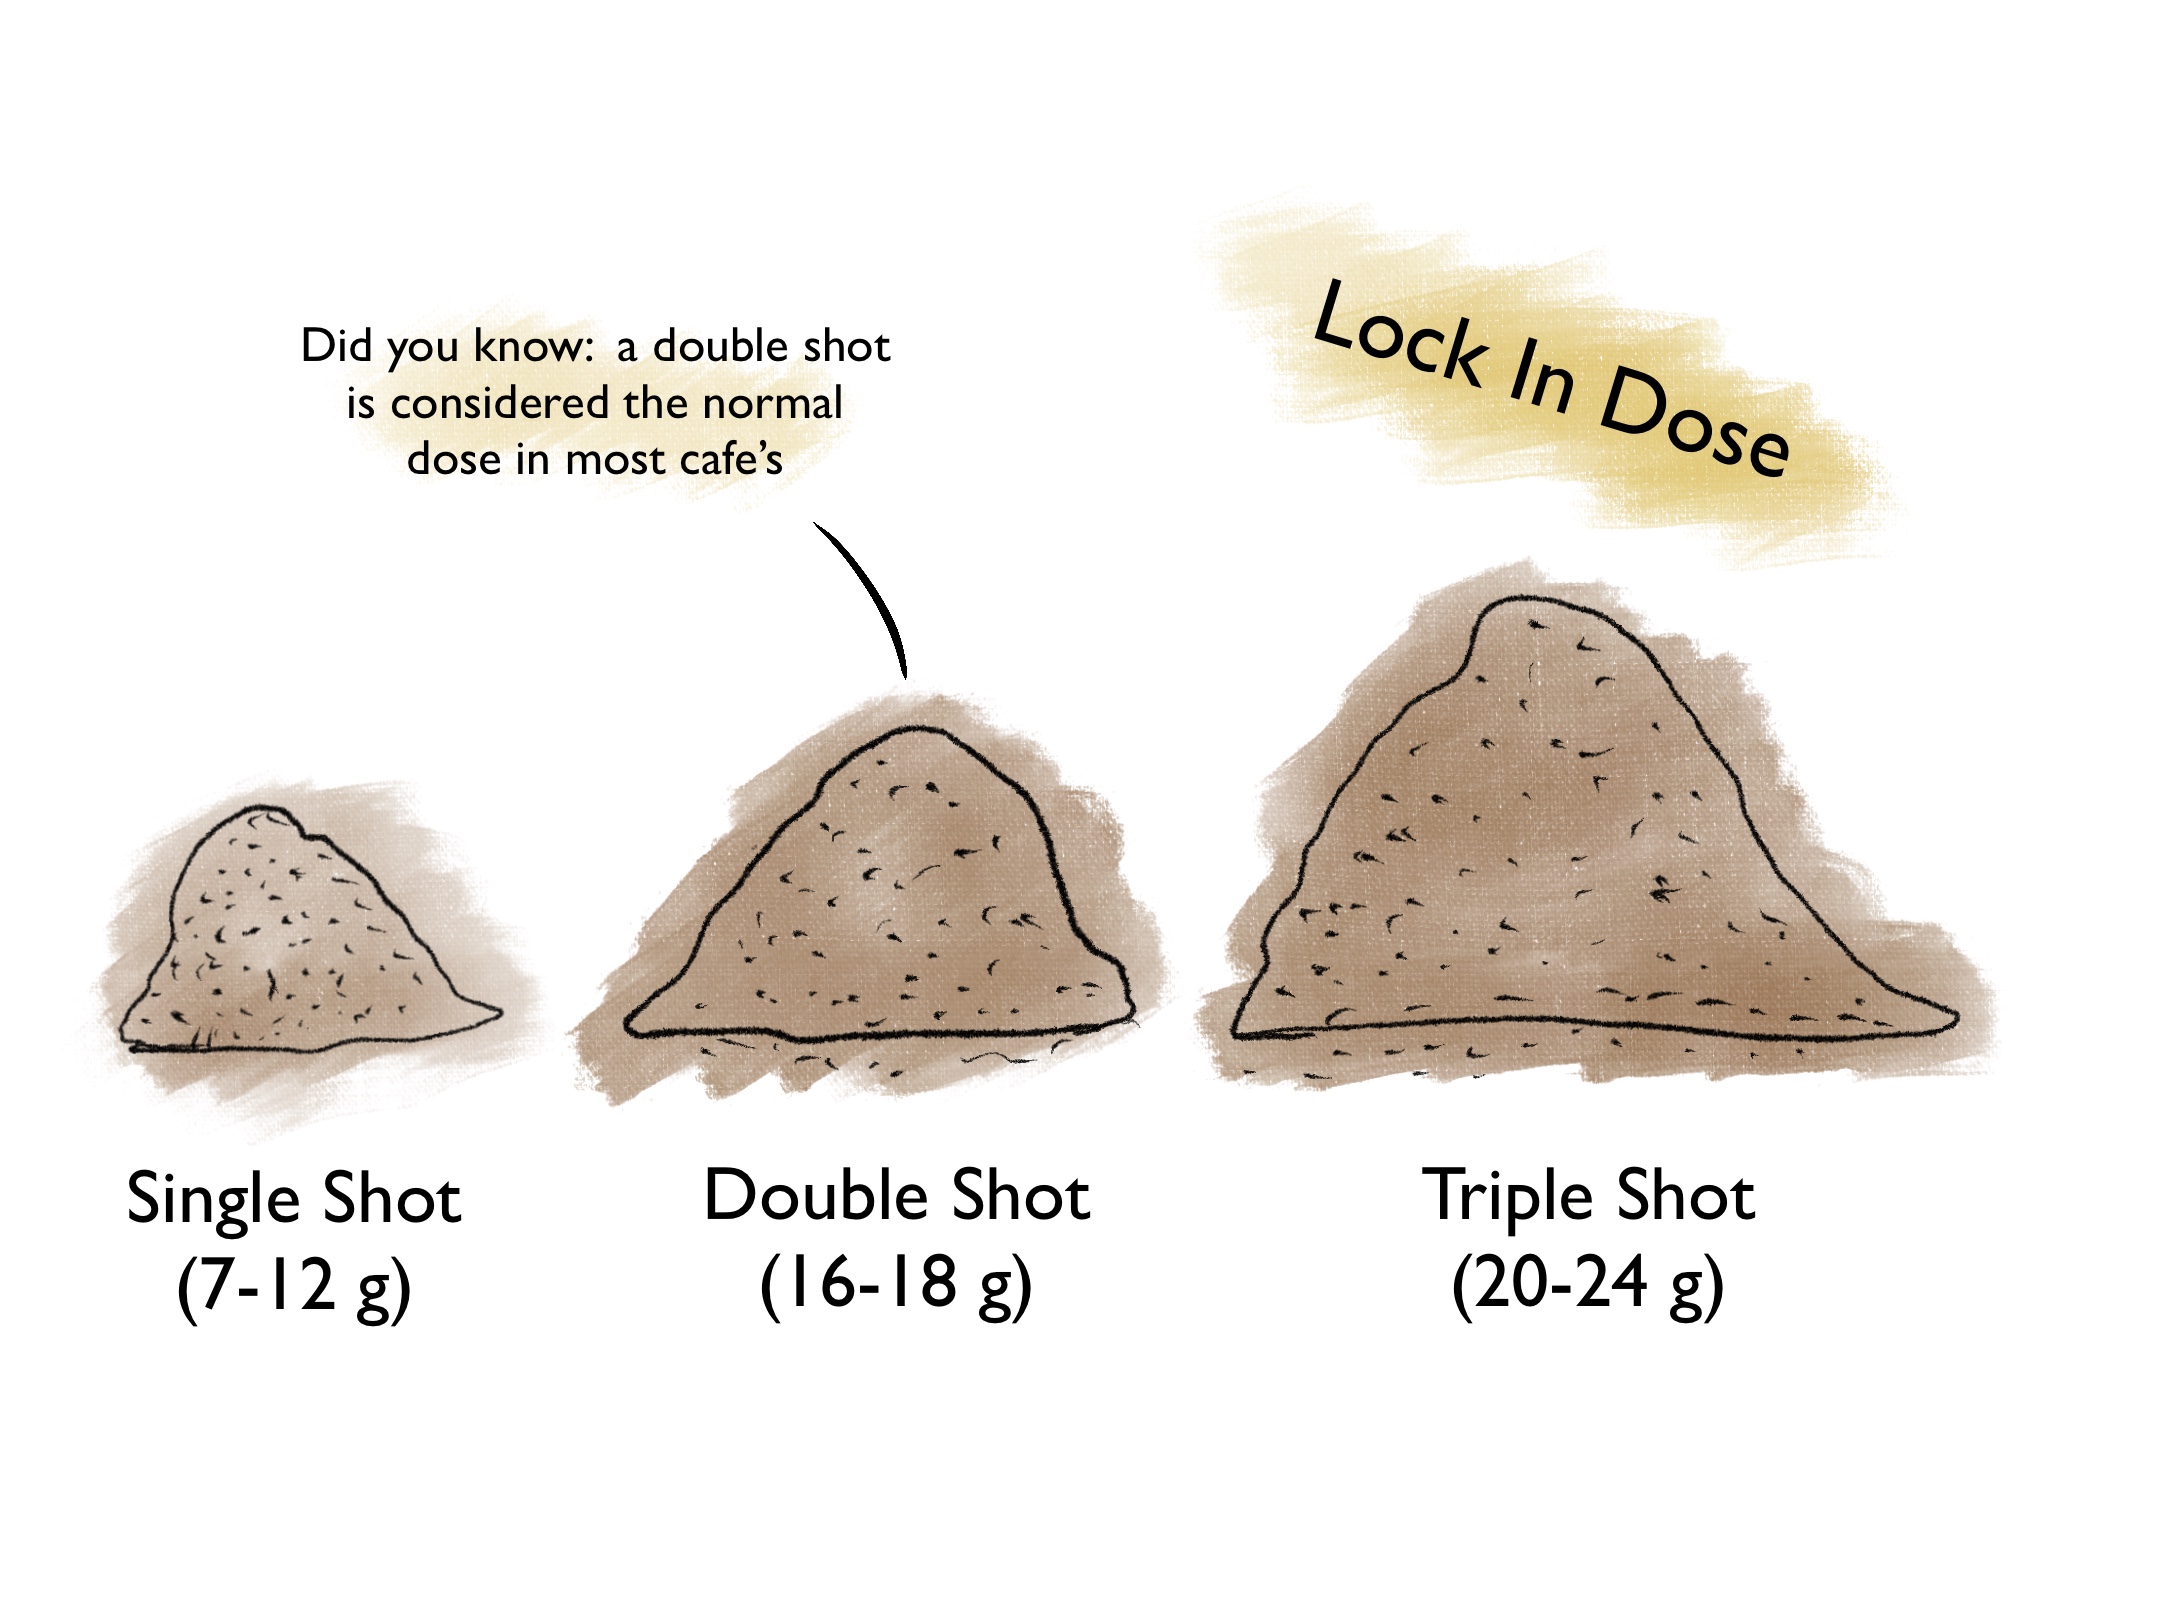
Step 1: Lock-In the Dose
The Dose: Determining the amount of ground coffee to use is the first step to pulling a shot of espresso. The dose determines your target yield and gives you a starting point and target endpoint.
Locking It In: Inside the portafilter is a metal 'basket' that holds the ground coffee. Baskets vary in size and depend on the diameter of the portafilter, as well as the dose. The industry standard is a 58mm diameter, double shot basket designed for 18 grams of coffee, but your dose may vary significantly. Take a look at your basket, as the recommended dose is usually imprinted on the side or bottom.
Remainng Consistent: While nothing is preventing you from adjusting the dose to work toward the golden ratio, it is often easier to keep the dose consistent and adjust the grind size and yield. When starting with a new machine and basket, it is often best to lock in your dose and reevaluate later if necessary.
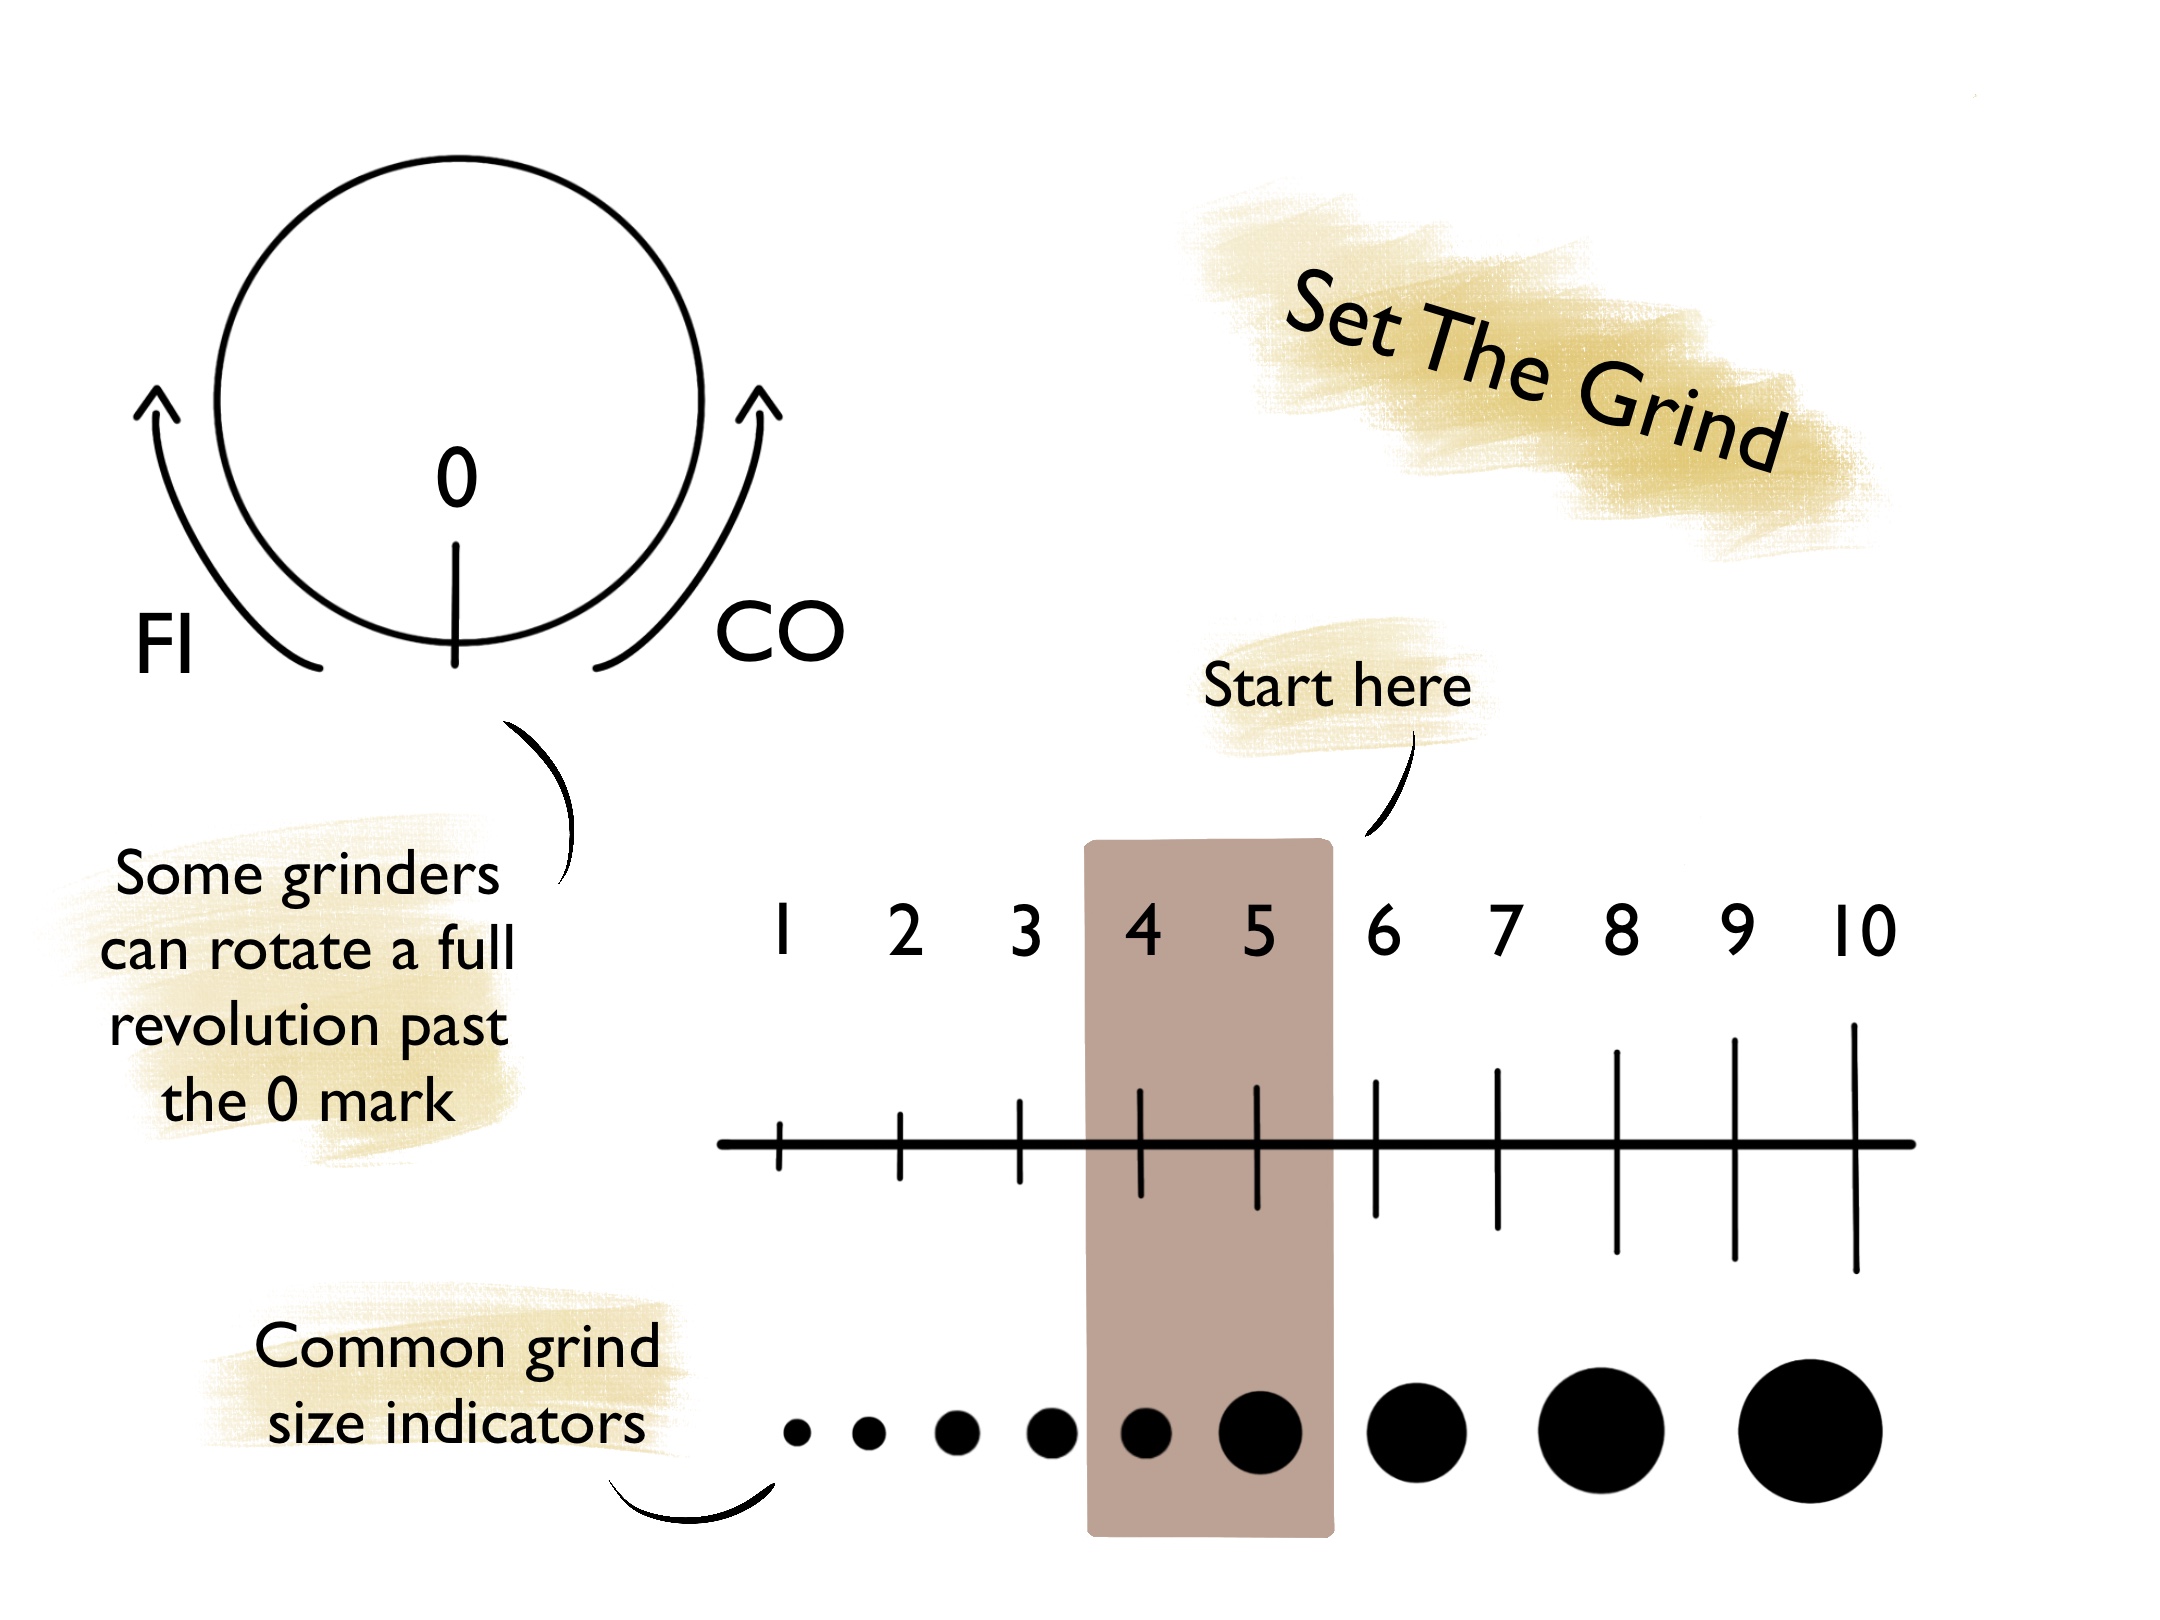
Step 2: Setting the Grind
Grind Size: A coffee's grind size refers to the size of the individual particles of coffee once it has been crushed by a burr grinder. When compressed into a coffee puck, these coffee grounds produce resistance against the water in the espresso machine, creating pressure and extracting espresso.
Adjsting the Grind Setting: Finer (FI) grounds create more resistance and often more extraction, while coarser (CO) ground grounds generate less resistance and less pressure. When starting out, set your grind setting close to the middle of the espresso range. Then you can adjust the grind based on the flow and taste of your initial shot.
Always Changing: Contrary to dose, which is best kept consistent, grind size is a variable that you will be constantly tweaking and adjusting bean to bean and even the same bean shot to shot. Remember, coffee is an organic compound, so the grind size needed to generate the proper pressure will change with the beans themselves.
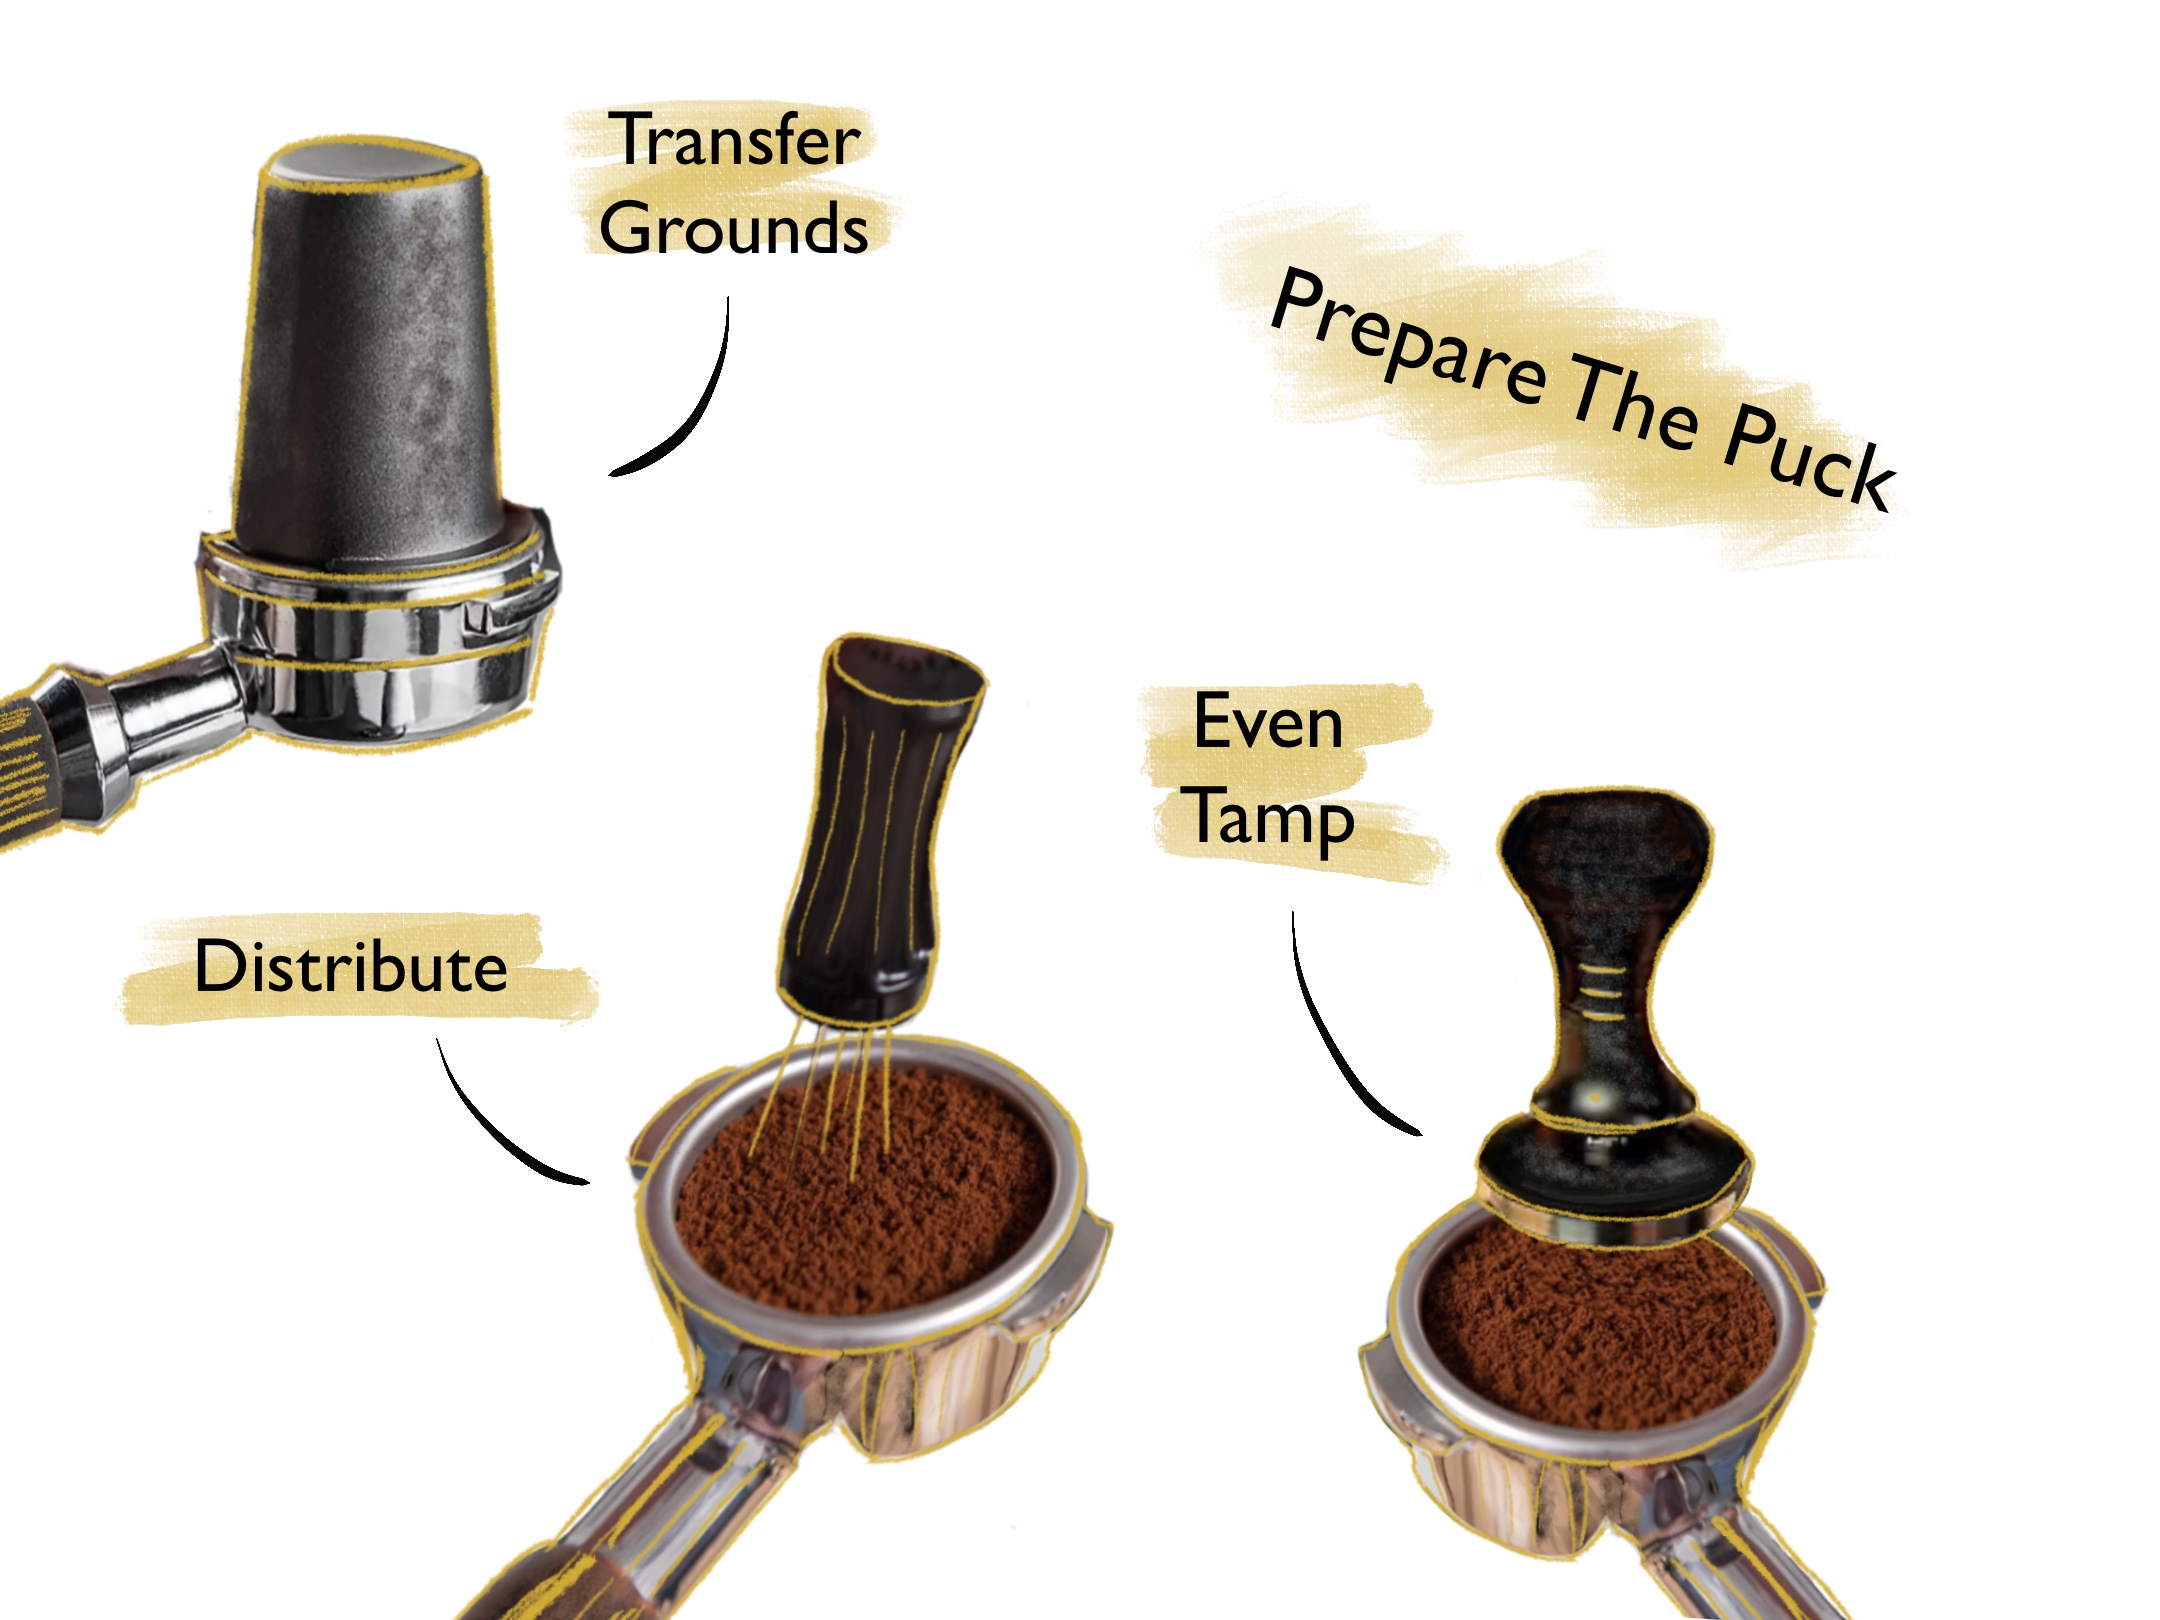
Step 3: Preparing the Puck
Transfering the Grounds: Most grinders can grind into a dosing cup or directly into the portafilter. If you are using a dosing cup, the first step is to prepare the puck by transferring the grounds into the portafilter.
Even Distribution: Often, ground coffee begins to form clumps resulting from static electricity or grinder design. Once the coffee is in the portafilter, break up any clumps with a coffee rake and ensure the coffee is evenly distributed within the portafilter. Skipping proper distribution increases the likelihood of a poor extraction as a result of channeling
Even Tamp. Even Extraction: With the grounds evenly distributed, the ground coffee is ready to be tamped into a compressed puck. Pressing firmly and evenly ensures the puck of coffee creates equal resistance throughout extraction. You are unlikely to tamp too hard, so press with conviction.
Consistent Prep: Creating and maintaining a consistent puck prep process is vital to pulling repeatable espresso shot after shot. The perfect dose and grind are useless without the method to turn it into a high-quality puck. While you can experiment with dosing tools, distribution, and tamp, ensure you only change one variable at a time and keep consistent when adjusting dose, grind, or yield.
Step 4: Pulling the Shot
Starting the Shot: With the portafilter locked in and a scale zeroed under your cup, it's time to start the shot. Many machines are started with the press of a button, flip of a toggle switch, or lift of a lever. Activating the machine will turn on the pump and start the pressure-building ramp-up.
Pre-Infusion & Ramp-Up: All machines take some time to ramp up to full pressure and may not reach the full 9 bar pressure for 5 to 10 seconds. In addition, many machines have 'pre-infusion' saturating the coffee with low-pressure water to help extract more flavor and limit the formation of water channels.
Understanding the Flow: Properly extracting espresso flows like warm honey. If your espresso is flowing fast, you're likely experiencing underextraction. If your espresso is barely dripping, then you're probably witnessing overextraction. Watching the espresso flow is an excellent way to estimate the extraction and prepare for adjustments.
Ending the Shot: The yield is the amount of liquid espresso derived from your tamped puck. As your yield reaches 2x your dose, you will want to end your shot. Ideally, your shot took 25 to 40 seconds to reach the proper yield. Note: Many Breville machines use volumetric dosing to automatically end the shot when a programmed yield is reached. Look at your owner's manual on how to enter 'manual-pull' mode.

Step 5: Taste and Adjust
Tasting the Espresso: For any good home barista, tasting your shots is essential to understanding extraction. A properly extracted shot - while strong - will taste complex and sweet, with a gentle bitterness. Harshly sour and salty espresso usually indicates underextraction. Intensely bitter espresso usually indicates overextraction. Tasting your shot before adding milk or water will give you a qualitative indicator of how your shot turned out.
Looking at the Numbers: In addition, looking at your ratio and extraction time will help you diagnose your shot. If your shot flowed fast and shot past a 1:2 ratio, you likely have an underextracted shot. Conversely, if your shot took more than a minute to reach the golden number, you are likely working with an over-extracted shot that will present as bitter.
Adjusting & Resetting: There are dozens of potential tweaks and pivots you can make to change how many soluble compounds are extracted when pulling your shot. For now, focus on adjusting the grind size and the volume yield. Clean your portafilter and your group head, and pull another shot!
What's Next?
Dialing In
As mentioned at the start of this guide, espresso is an iterative process witht the goal of working towards the golden ratio and delicious flavor. Dialing In is the process of adjusting dose, grind size, and yield to work towards this goal. Coffee is an organic compound, and as a result, each bag of beans you brew will need to be dialed in to achieve the best possible flavor.
Want another coffee?
Take the Quiz
Start Now
For Personalized Recommendations
Discover Machines
Including Breville, Profitec, & Lelit
Discover Grinders
Including Eureka, Baratza, & Niche